Monday, January 21, 2013

Cool Blonde

Seeing as how it's a new year, I decided it's time for a new me. 2012 was a rough year, so my roommate and I decided 2013 is going to be our year. It's going to be a good one. No more shedding tears over guys, friends, or life. 

All we want is smiles and laughter all around!

As a result I have decided to say goodbye to being a brunette and hello to being a blonde. It's not quite as blonde as I was going for but I like it regardless. I feel so rejuvenated!

Much love, 
Katie

Wednesday, January 16, 2013

Christmas Gifts: Studs and Dip-Dye

Last Halloween, I borrowed my roommate's sweatshirt and (with her permission) took scissors to it for my costume. A couple years later, I decided to make up for that. 

I bought a regular Hanes sweatshirt at Walmart and dip-dyed it with bleach.

Since it's the winter I did this in my bathroom but I should probably have done this in a better ventilated spot.

The bleaching processes took way longer than I had thought it would. I started with a bleach-water mixture but ended with just pure bleach to try to REALLY get the ends. Still wasn't the result I wanted exactly but it worked well enough.

Just bleach. Trying to get the ends more of a "white"

After the sweat shirt had been rinsed through the washer and air dried I started adding the studs. I purchased the studs at Hobby Lobby. It was about $2 for a pack of 30. For those of you who don't know where to find them (like me) they were in the LEATHER section.

The studs were simple to attach. Decide where you want it, poke it through the fabric, and push in the ends underneath (I used a flat head screwdriver and it worked great)

FRONT

BACK

Now I just need to make me one!

Much love, 
Katie

Sunday, January 13, 2013

Christmas Gifts: Coffee Mugs

Seriously, so simple! I was originally going to try the whole Sharpie baking thing, but decided to use ceramic paint instead. I have heard mixed reviews on whether the Sharpie thing works so I thought paint might last longer. Which I'm not completely sold on either--I'll have to ask my friends who received these mugs from me..

I bought some coffee mugs at Target for maybe $2.00 a piece. Then I got a Painters pen at Hobby Lobby for maybe $8.00. The package said it worked on basically anything and was "permanent". That was good enough for me!

The hardest part was coming up with a quote or something to draw/write on the mugs. And then all I needed was a steady hand (which I don't always have). It took no time at all. I was done in 15 minutes (at the most).  I loved them so much I thought about keeping them! But in the end the mugs did live out their fate in becoming Christmas gifts.

Quote on red mug: Think! You can think any think that you wish..-Dr Suess
Much love, 
Katie

Thursday, January 10, 2013

Teacher Appreciation: Pencil Letter

Although I thought the canvas bags were great gifts, I wanted to make something different for my cooperating teacher. I had seen so many of the crayon letters on Pinterest, and had even helped my roommate make one a while back. I thought these were great but crayons didn't seem to be the right thing for a middle school math teacher. Ergo, pencils.

If you know anything about middle school students and/or math, then I am sure you are well aware of the battle with pencils. The students almost never bring a pencil (or in most cases lose it by their second class). And it is my personal opinion (as I'm sure most math teachers would agree) math needs to be done in PENCIL! No exceptions. 

And back to my project...

Pencils were a better fit than crayons.

Materials Needed:
Shadow Box
Pencils
Pencil Sharpener
Hot Glue Gun

I found a font I liked and printed out the letter N as a reference. I then cut the pencils to the size I wanted. This was easiest with a steak knife and then I broke them apart once I had cut a little around the whole pencil.


The worst part was sharpening the pencils. There were a lot of pencils in the end, and a lot of TINY ones. I decided to use a little hand sharpener instead of an automatic one. I ended up having to buy another sharpener because the first one got too dull from all the sharpening. And my fingers were killing me! So I'd probably think about choosing a that you don't mind sharpening--too little, and you may hate it by the end.

Once all the pencils were cut and sharpened, I covered the back of the shadow box with contsrcution paper. Then hot glued the pencils down. 


 **My biggest suggestion when doing this (besides the size of the pencils) is not mixing up the penicls once they are cut. All my pencils accidently got mixed up before I could glue them. So then I had to spend a day trying to figure out where the pencils went. I'm still not sure I got it completely. 
All in all it was a big mess. So be warned!


Much love, 
Katie

Tuesday, January 8, 2013

Teacher Appreciation: Canvas Bags

Finished my student teaching in early December. It was such a great experience! As a thank you to the teachers I worked with throughout the semester, I decided to make them all something.

For the two paras and the co-teacher I worked with, I made them all canvas bags. Saw this idea on Pinterest and I have to admit looking at the finished product, it's absolutely amazing how simple this was to do.

Materials Needed:
Canvas Bags--I bought a package of 3 which was cheaper than buying 3 indiviually
Large 12" Doilies--Package came with 6 which was more than enough (I only used 2)
Fabric Paint
Paint Brushes

I got everything at Hobby Lobby for 15-20 bucks. Talk about a deal! Three gifts for $20? Yes, please!

I definitely recommend ironing the bags before doing anything!

After figuring out where I wanted everything to be, I cut the doily in half and taped it in place. Then using a paint brush, dabbed paint into the design of the doily.


Once I had painted the whole design, I removed the doily. The paint was still wet.


I went ahead and did this to all three bags before moving on. 
By the time I was done with the last bag, the first was basically dry. 

I then printed off their initials to use for stencils.
 I cut out the printed part and traced the letter with a pencil. Then painted it in.


This was so easy and fun to do! Every one was just amazed and the end result, thinking I had somehow painted it myself. I almost didn't want to tell them how I really did it ;)


Much love, 
Katie

Wednesday, September 12, 2012

Celeb Crush: Emma Stone

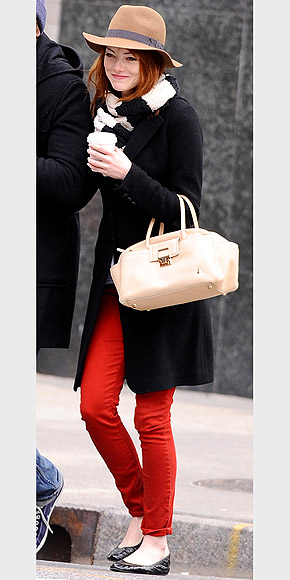
I don't feel like my girl crush on Emma Stone needs any explanation. Just watch any of her movies or interviews and I am sure you will feel the same. Although I firmly believe that we would be BEST FRIENDS if we were ever to meet, my crush goes farther than just her personality. I also LOVE her look. Whether she is blonde or red-head, on the red carpet or on the town, killing zombies or writing a book from the maid's point of view--I think she looks fabulous.

They are too cute

 
Love the pop of red on the toes
Simple elegance.
Ryan Gosling...

Friday, September 7, 2012

Fall Inspirations


Sunday, August 5, 2012

Must Haves

These are a few things that I swear have made my life a little less hectic or are staples in my closet. They are without a doubt some of the best purchases I have made.

Bedroom/Storage

1. Wonder Hangers.

Yes I do mean the As-Seen-On-Tv Wonder Hangers. These things really do double your closet space. They are pretty reasonable in price. Only $10 for a box of 8. Do yourself a favor and buy these.

2. Sterilite Storage Drawers

Easy way to add more storage to a room. I have one in my closet and a larger one in my room. Makes it where my dresser isn't quite so full.

3. Command Strip Hooks

These things are great. I have them hanging purses, belts, towels, and anything else I need to hang up.  Not to mention they now have picture and poster hanging command strips. Way better than nails and tacks.

4. Over-the-Door Shoe Holder

I have a lot of shoes. This over-the-door holder helps keep them all out of the way and I can see them all. Before I had them all in tubs but I kept forgetting what I had so this is way better.

5. Mainstays Shoe Rack

Stackable and Expandable. I think that basically says it all. It only takes up about 4 feet of space along one wall in my room. I can probably fit about 50 or more shoes on it. Its a great buy.


Beauty/Style

1. Roller Set Clips

Curl your hair and use these clips to clip up the curl. While it cools, do your make-up. Helps set your curls, and doesn't leave any crinks like bobby pins sometimes do. Not to mention these are easier to open with one hand than bobby pins are. I found mine at Wal-Mart for roughly the same price as bobby pins.

2. Dry Shampoo

Let's be honest. We don't always wash our hair. Sometimes we skip a day a two. Dry Shampoo is a great way to get rid of any second (or third) day greasiness and give it a fresh smell.

3. Headwrap Headband

Also great for second day hair. Wear with your hair down, up, or tucked. Adds a little something to your look. And they are pretty cheap and you can find them anywhere.

4. Boots

Ask anyone and they will tell you I am OBSESSED with boots. They can be worn casual or dressed up. And there are so many options on styles that they can seriously be worn with everything.

5. Tights

Tights are such a simple way to add a pop of color to an outfit. They can be quirky or sophisticated. And they have the added bonus of being able to be worn year round.

6. Scarves

Like tights, scarves can add color and personality to an outfit. They can be worn on your neck, in your hair, on a purse, as a belt, and any other way you can think of.


Much love, 
Katie

Friday, July 27, 2012

Ombre Alert

I have once again changed my hair color. Go figure. For work I needed to do something somewhat tame -- i.e. no pink, blue, purple, green, etc. Which I have done before (except green which I plan to do next summer). So I gave into the OMBRE trend that has been appearing lately.

It wasn't that hard to do. There are a TON of "How To's" out there for this dye job. YouTube, Google, Pinterest. It's everywhere. Basically you just bleach what you want lightened, allowing more time for the lightest/ends of your hair.


Overall I am pleased with the results. I may tweak it here and there. Make the ends a little lighter. But who knows, I may just leave it like this. 

Much love, 
Katie


Wednesday, July 25, 2012

DIY Curling Wand

I have been wanting to get a curling wand for a while now. The only issue was dropping the $30 or more for one. Then as luck would have it I stumbled across The Beauty Department's tutorial on making your own curling wand from an old curling iron. Needless to say I was ecstatic. Not only would I have a curling wand, but it wouldn't cost me anything--I have at least 3 curling irons that I don't use anymore. And honestly, what's better than getting something for free?

Use The Beauty Department for their tutorial. But really its pretty simple--just remove the clamp.


** Please ignore the grossness of the iron. I haven't had a chance to clean it yet.

Much love, 
Katie

Monday, July 23, 2012

Braided Tank


 Materials Needed:
  • Old T-Shirt--I used one I found in a free box at school
  • Scissors
  • Needle and  Matching Thread


Cut off the sleeves of the t-shirt. About 1 inch under seam is good. Once you have the first sleeve cut off, you can use it as a template to cut the other one off.


Extend the holes cut on the BACK OF SHIRT only. Making the shirt into more of a razor back.


Cut off the collar. About 1 inch below.


Cut straight across the razor back. Now there should be a flap on the back of your shirt.


Cut the flap into three section for the braid. Pull the strips a little to make them a little neater and easier to braid.


Braid the three strips. Using the needle and thread, sew the ends of the braid together. 


Find the middle of the collar and sew the braid to it.

Take a strip, about 1 inch wide and 3-4 inches long, from the extra you have cut from the shirt. Sew one side to the back of the braid. Wrap the strip around the braid and sew the end. This works to make it look neater and give it an overall cleaner look.


Much love, 
Katie

Saturday, July 21, 2012

What I'm Wearing: Movie and Dinner with the Girls

Bandeau from Aerie


 Sock Bun


Elephant Necklace and Black Tank from Forever21


Nut and Lace Bracelet I made from Pinterest


Teal Jeggings from Wal-Mart
Black Flats from Target


Much love, 
Katie